Print File Specifications
Preferred File Types
Our printers require .pdf files, so that is the preferred file format when submitting your print files. We can also accept .psd, .ai, or .indd files, especially if some editing work is needed, but please be sure to send along any fonts or linked images used in your file as well if you choose to do this. We are able to open Word, Publisher, and Excel files, but the formatting often changes when opened on different computers so we will have to convert to .pdf and send you a proof to be sure everything looks as intended. We recommend skipping this step by saving your file as a .pdf on your machine, and sending the .pdf, which will flatten all your fonts and formatting and guarantee the file we receive and open on our machine looks the same as the one you are seeing on your machine.
![]()
Resolution
All images need to be saved at 300 dpi or higher in order to be print ready. Keep in mind most images saved from the internet will be only 72 dpi and not printable except at very, very small sizes. Whatever size an image is at 300 dpi resolution will be the largest we can print it due to the nature of raster graphics. Please see Vector vs. Raster Graphics below for more information.

It’s important to begin with a high-quality image which means the highest resolution and image dimensions you can get. When it comes to source images, bigger is better, because you can go down in size, but not up, without losing quality.
Color Mode
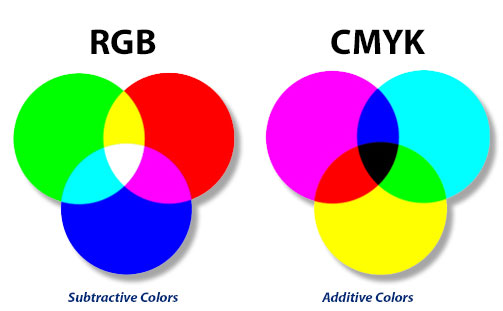
Files should be created and saved in CMYK color mode as opposed to RGB. Generally speaking, RGB is for web use and digital displays, while CMYK is for print. CMYK stands for Cyan, Magenta, Yellow, and Black, the four colors of toner printers use to render all other colors. If you send an RGB file to print, we can still print it, your colors may change unpredictably. This is why it’s best to create or convert your file to CMYK and make sure it looks the way you intend before sending it to print.

Color Matching
Most items at Global Printing are printed digitally using the industry standard of “pleasing color.” This means the color printing is done in a way that’s pleasing to the eye. The resulting printed hues will be representational of the actual colors, but not an exact match. An alternative technique, called “critical color” or “matching color,” usually applies to highly controlled printing jobs done on a four-color offset printing press, and is used when an exact match of colors is absolutely necessary to the success of a printed piece, at a significantly higher production cost.
Bleeds
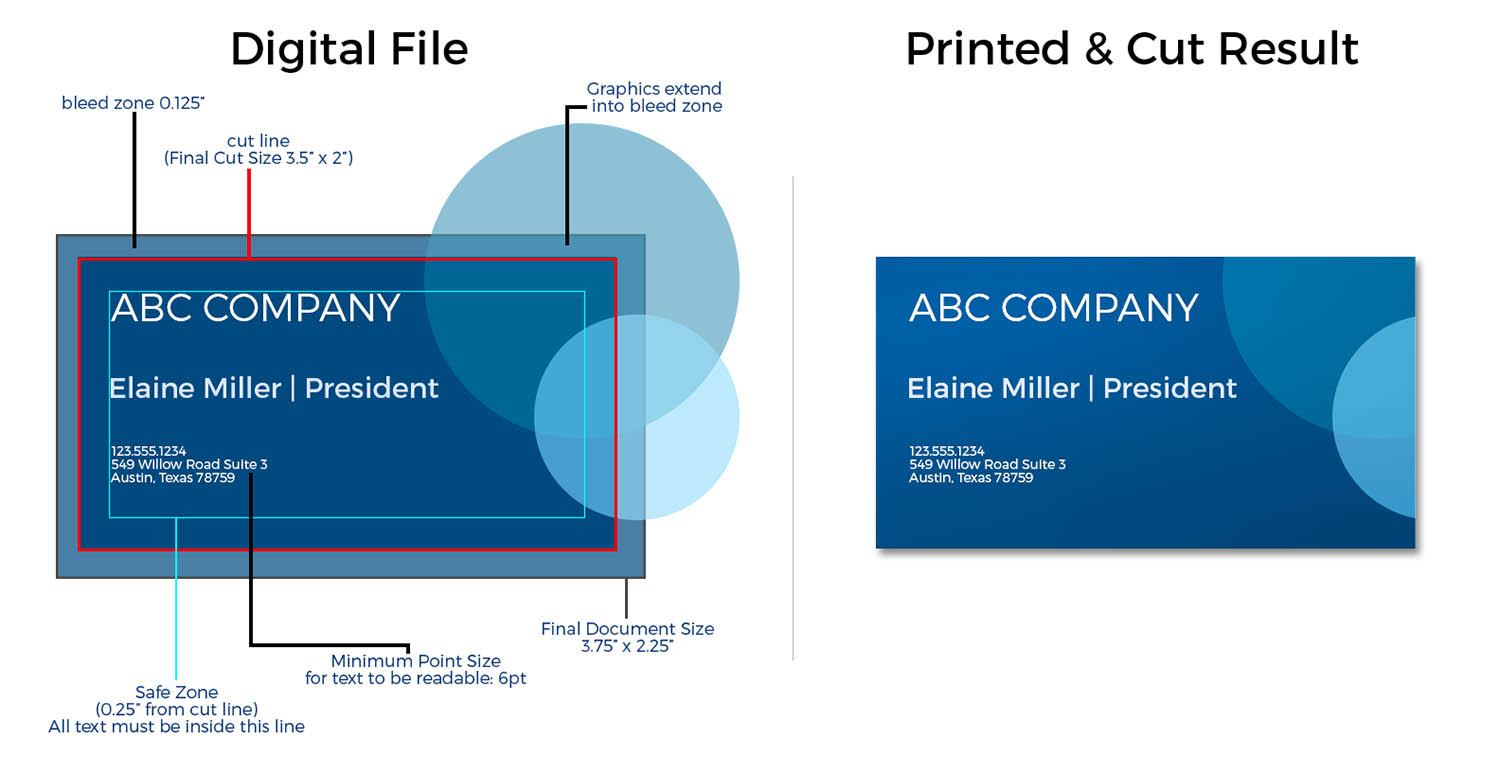
If you would like color to go all the way to the edge of your finished piece, you will need to include a .125″ bleed on all four sides. This will add a total of .25″ to the height and width of your file size, so a file for a 5″x 7″ Invitation with full bleed would need to be 5.25″ x 7.25″. All text and important visual elements should remain at least .25″ away from the cut line. The graphic below shows proper file setup for a standard 3.5″x 2″ business card with bleeds.
Need help exporting your files with bleeds? Here’s a few handy reference links:
Vector vs. Raster Graphics
What’s the difference?
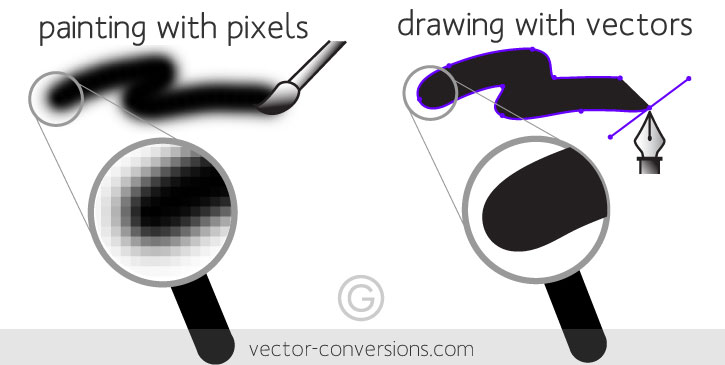
There are two main type of image files: Raster and Vector. Raster images are created with pixel-based programs like Photoshop or captured with a camera or scanner. They are more common in general, and are widely used on the web. Common file types are jpg, gif, or png. Vector graphics are created with vector software and are shape and mathematic based, so they don’t lose quality at any size. Their file names are .ai, or .eps.
Raster images are made of pixels. A pixel is a single point or the smallest single element in a display device. If you zoom in to a raster image you may start to see a lot of little tiny squares.
Vector images are mathematical calculations from one point to another that form lines and shapes. If you zoom into a vector graphic it will always look the same.
A raster image has a specific number of pixels. When you enlarge the image file without changing the number of pixels, the image will look blurry. When you enlarge the file by adding more pixels, the pixels are added randomly throughout the image, rarely producing good results. Please see this helpful website on why .jpgs are not generally good for printing.
When you enlarge a vector graphic, the math formulas stay the same, rendering the same visual graphic no matter the size. Vector graphics can be scaled to any size without losing quality. This is why logos are almost always created in vector form, so they can be applied to many different uses in many different sizes without ever looking degraded.
So if you have a raster image you’d like printed, it will only look good at the size your file currently is, or shrunken down smaller. Enlarging significantly will produce blurry, pixelated results. If you have a vector image, we can print at any size. If you need a vector image created, you can’t just re-save your raster image in a vector program, it must be created as a vector graphic from scratch. Our design team is able to provide this service for you if needed; please contact us for estimates as the time needed to re-create your image in vector form will depend on how complicated your graphic is.
Booklets
Booklets are a great way to present your information in a clean and professional format. We have special software that can convert your multiple page document into printer’s spreads so you can submit your file in single page format- please do not submit reader’s spreads. In bookletting, each large sheet will have 4 reader’s pages on it (Left Side front and back and Right Side front and back), so your documents total number of reader’s pages must be a multiple of four. If you have an odd number of pages, you will need to either add or delete some. Most people solve this issue by adding blank pages toward the front and back, or “Notes” pages.


